[TOC]
此文已经过时,巨硬发布了 WSL(Windows Subsystem for Linux), 遂使用 WSL 取代了 cygwin!
1. cygwing是什么?
cygwin 是一个在windows平台上运行的类UNIX模拟环境,是cygnus solutions公司开发的自由软件(该公司开发的著名工具还有eCos,不过现已被Redhat收购)。它对于学习UNIX/Linux操作环境,或者从UNIX到Windows的应用程序移植,或者进行某些特殊的开发工作,尤其是使用GNU工具集在Windows上进行嵌入式系统开发,非常有用。随着嵌入式系统开发在国内日渐流行,越来越多的开发者对Cygwin产生了兴趣。(from 百度百科)
    a large collection of GNU and Open Source tools which provide functionality similar to a Linux distribution on Windows.

    a DLL (cygwin1.dll) which provides substantial POSIX API functionality.
2. 安装
从 http://www.cygwin.com/ 下载安装文件
http://www.cygwin.com/
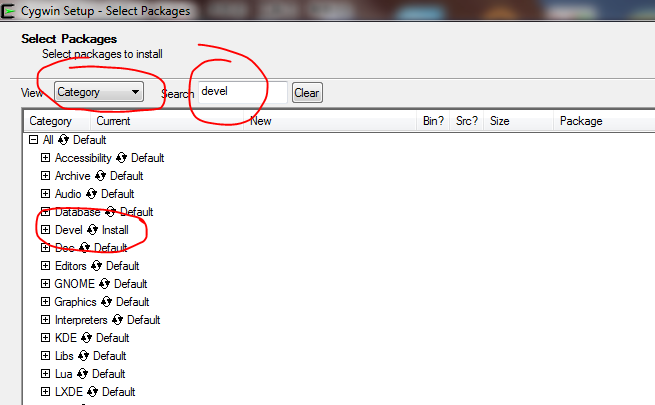
记得装Devel package: 右上方的 view 按钮, 切换到 category 模式, serch填devel然后按回车,列表里就能看到 Devel 分类了。(建议把devel都装上,点击Default切换到Install)
3. 设置上网代理
cygwin的terminal和linux操作系统类似,可以修改登陆用户home目录的.bashrc设置环境变量及alias,首先设置上网代理
export http_proxy=135.245.148.234:8000
export ftp_proxy= 135.245.148.234 :8000
export https_proxy= 135.245.148.234 :8000
export PATH=$PATH:/home/jiangusu/work/toolkit/scripts
alias vim='gvim'

alias vi='gvim'
alias oss='cd /cygdrive/d/work/repo/oss'
4. apt-cyg软件安装工具
apt-cyg is install tool for Cygwin similar to debian apt-get. apt-cyg是 Cygwin的软件安装工具,有了它,以后cygwin需要安装软件的时候特别有用。 从 apt-cyg官网下载,修改可执行属性,然后移动到/usr/bin即可使用:
jiangusu@CV0019059N0:~$ wget https://raw.githubusercontent.com/transcode-open/apt-cyg/master/apt-cyg

jiangusu@CV0019059N0:~$   chmod 755 apt-cyg
jiangusu@CV0019059N0:~$  mv  apt-cyg /usr/bin
选择软件源:
$ apt-cyg mirror http://mirrors.163.com/cygwin

Mirror set to http://mirrors.163.com/cygwin.

$ apt-cyg mirror  http://cygwin.mirror.constant.com/
5. 设置ssh登录 cygwin
默认的 cygwin控制台 使用不是很方便,且只能打开一个窗口,安装ssh服务器就可以使用其他终端工具,如secureCRT或者xshell登录 cygwin,也可实现多窗口登录。
参考文档: xshell 登录 cygwin
5.1 安装openssh
jiangusu@CV0019059N0:~$ apt-cyg list | grep ssh
libssh2_1
mingw64-i686-libssh2
mingw64-x86_64-libssh2
openssh
没有安装使用命令apt-cyg install openssh安装。
5.2 增加环境变量
截图是windows10系统增加环境变量。 (1)在系统变量框中新建变量名为:CYGWIN,变量值为:ntsec tty 的变量。
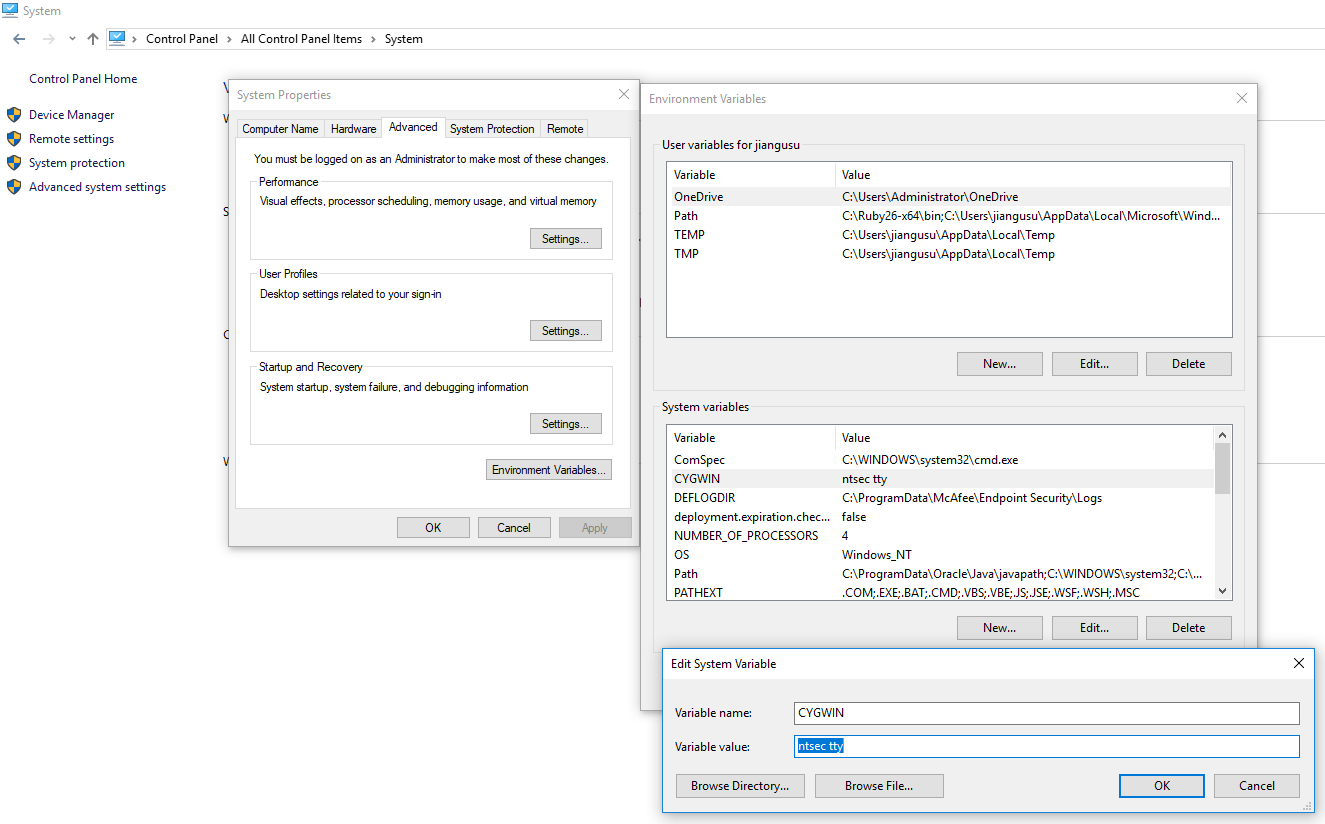
(2)编辑path变量,在原变量值后加上以分号分隔的C:\Cygwin\bin字符串,注意保留原变量的值!
5.3 运行 ssh-host-config并启用 ssh服务
打开cygwin控制台:输入ssh-host-config,一路yes,遇到value填写ntsec tty。
$ ssh-host-config

Overwrite existing /etc/ssh_config file? (yes/no) yes

Generating /etc/ssh_config file

Overwrite existing /etc/sshd_config file? (yes/no) yes

Privilege separation is set to yes by default since OpenSSH 3.3.

However, this requires a non-privileged account called 'sshd'.

For more info on privilege separation read /usr/share/doc/openssh/README.privsep.

Should privilege separation be used? (yes/no) yes

Generating /etc/sshd_config file

Host configuration finished. Have fun!
提示安装成功. cygwin控制台 输入net start sshd, 启动ssh服务.
jiangusu@CV0019059N0:~$ net start sshd
The CYGWIN sshd service is starting.
The CYGWIN sshd service was started successfully.
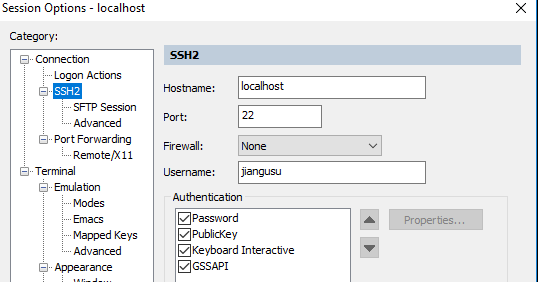
5.4 srcureCRT登陆cygwin
hostname填写localhost,使用本机用户名和密码。